パケット解析でバイナリデータを見やすく表示したい場合、Wiresharkのカスタムプロトコル解析機能(Dissector)が便利です。今回は、TCP上で動作する独自プロトコルのDissector作成方法を解説します。
プロトコル仕様
通信仕様
- 上位プロトコル: TCP
- 使用ポート: 15000, 15001
パケットフォーマット
| フィールド | データ型 | サイズ | 説明 |
|---|---|---|---|
| length | uint16 | 2バイト | パケット全体の長さ |
| command | uint8 | 1バイト | コマンド種別 |
| operate | uint8 | 1バイト | 操作種別 |
| datalen | uint16 | 2バイト | データ部の長さ |
| data | bytes | 可変長 | 実データ |
コマンド種別
- 0x01: Hello
- 0x02: Welcome
- 0x0F: Bye bye
Dissectorの実装
-- プロトコル定義
my_proto = Proto("myproto", "My Custom Protocol")

-- コマンド種別の定義
local commands = {
    [0x01] = "Hello",
    [0x02] = "Welcome",
    [0x0F] = "Bye bye"
}

-- フィールドの定義
local fields = {
    length = ProtoField.uint16("myproto.length", "Length", base.HEX),  -- base.HEXに変更
    command = ProtoField.uint8("myproto.command", "Command", base.HEX, commands),
    operate = ProtoField.uint8("myproto.operate", "Operate", base.HEX),  -- base.HEXに変更
    datalen = ProtoField.uint16("myproto.datalen", "DataLength", base.HEX),  -- base.HEXに変更
    data = ProtoField.bytes("myproto.data", "Data")
}

my_proto.fields = fields

-- Dissector関数の実装
function my_proto.dissector(buffer, pinfo, tree)
    -- バッファサイズのチェック
    if buffer:len() < 6 then return end

    pinfo.cols.protocol = "MYPROTO"
    local subtree = tree:add(my_proto, buffer())
    local offset = 0

    -- Length (リトルエンディアン)
    local length_val = buffer(offset, 2):uint()
    local length_item = subtree:add(fields.length, buffer(offset, 2))
    length_item:append_text(string.format(" (%d)", length_val))  -- 10進数の値も表示
    offset = offset + 2

    -- Command
    local cmd_tree = subtree:add(fields.command, buffer(offset, 1))
    local cmd_val = buffer(offset, 1):uint()
    if commands[cmd_val] then
        cmd_tree:append_text(" (" .. commands[cmd_val] .. ")")
    end
    offset = offset + 1

    -- Operate
    local op_val = buffer(offset, 1):uint()
    local op_item = subtree:add(fields.operate, buffer(offset, 1))
    op_item:append_text(string.format(" (%d)", op_val))  -- 10進数の値も表示
    offset = offset + 1

    -- DataLength (リトルエンディアン)
    local datalen = buffer(offset, 2):uint()
    local datalen_item = subtree:add(fields.datalen, buffer(offset, 2))
    datalen_item:append_text(string.format(" (%d)", datalen))  -- 10進数の値も表示
    offset = offset + 2

    -- Data
    if buffer:len() >= offset + datalen then
        subtree:add(fields.data, buffer(offset, datalen))
    end
end

-- プロトコルの登録(複数ポートに対応)
local tcp_table = DissectorTable.get("tcp.port")
tcp_table:add(15000, my_proto)
tcp_table:add(15001, my_proto)
インストール方法
- 上記のコードを「myproto.lua」として保存
- 以下のディレクトリに配置:
- Windows: C:\Program Files\Wireshark\plugins
- Wiresharkを再起動
使用方法
- Wiresharkでパケットキャプチャを開始
- TCP port 15000または15001宛のパケットが自動的に解析される
- パケットリストで対象プロトコルは”MYPROTO”として表示
- パケット詳細ペインでフィールドごとの解析結果を確認可能
結果
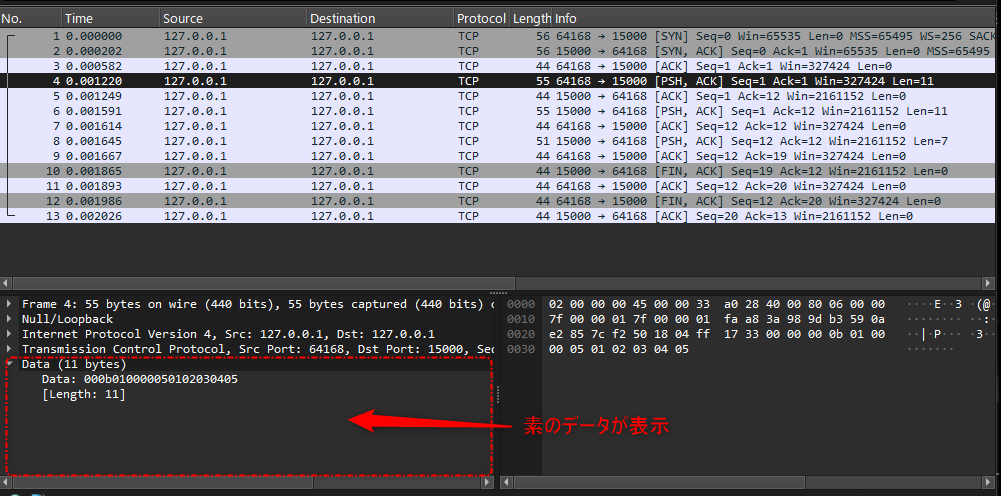
解析前のログ
解析ログ
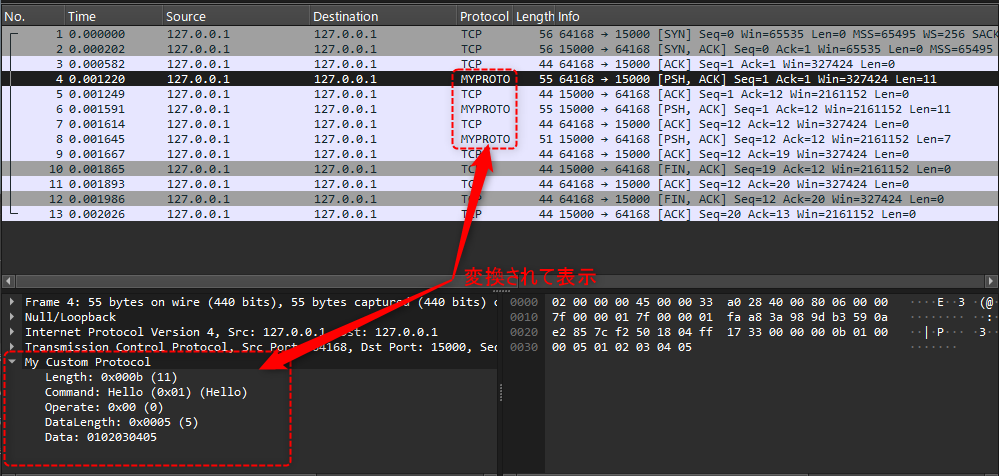
うまく、解析して、表示されています。
まとめ
このDissectorを使用することで、TCP port 15000および15001で通信される独自プロトコルのパケットを構造化して表示できます。各フィールドは16進数と10進数の両方で表示され、特にコマンド種別は定義された文字列(Hello、Welcome、Bye bye)で表示されるため、プロトコルの解析やデバッグが効率的に行えます。


コメント